This guide provides information on how to install, setup, and use OpenXR Motion Compensation with Sim Racing Studio.
OpenXR Motion Compensation (OXRMC) is the latest version of motion compensation which removes a motion platform's movements by changing the communicated position of a VR Headset before the VR image is rendered. This will allow the VR image to remain firmly in the seat or cockpit when racing or flying instead of being moved outside of the car or cockpit when the motion platform has a large amount of movement. This will increase the immersion and improve the actual feeling of motion while in VR.
OpenXR is a new open standard that provides high-performance access to Augmented Reality (AR) and Virtual Reality (VR)—collectively known as XR—platforms and devices (https://www.khronos.org/openxr/). OpenXR is the latest version of VR motion compensation which can be utilize instead of OpenVR motion compensation.
Important: Not all games currently support OpenXR for VR. An initial list can be found here: https://mbucchia.github.io/OpenXR-Toolkit/compat.html Please review if the game supports OpenXR before using OpenXR Motion Compensation. If OpenXR is not supported, OpenVR Motion Compensation is available here: https://simracingstudio.freshdesk.com/support/solutions/articles/35000209208-motion-compensation-setup or you can utilize OpenComposite which allows OpenVR games to use OpenXR instead (details in the guide below).
For OXRMC Troubleshooting, please utilize this article: https://simracingstudio.freshdesk.com/support/solutions/articles/35000219657-openxr-motion-compensation-troubleshooting
Note: The Sim Racing Studio OpenXR Motion Compensation will compensate platform movement on the Pitch, Roll, Sway(Roll), and Surge axis for actuator and non-actuator platforms. Yaw (Traction Loss), Linear Sway (Double Traction Loss), and Heave are not compensated.
Topics include:
Requirements
Witmotion Sensor Installation
OXRMC Installation
Initial Sim Racing Studio Configuration
Configuring OXRMC Settings
Creating an Activate and Recalibrate Center Shortcut
Launching OXRMC
OXRMC Graphic Overlay
Adjusting SRS Motion Compensation Settings
OXRMC Center of Rotation Save Location
Keyboard Shortcuts
Launching OXRMC
OXRMC Graphic Overlay
Adjusting SRS Motion Compensation Settings
OXRMC Keyboard Bindings
Troubleshooting
Requirements
The following items are required to use SRS OpenVR Motion Compensation:
- SRS Premium Add-On Subscription for the SRS Base License
- OpenXR Motion Compensation (OXRMC)
- Witmotion WT901C (RS232) Sensor and Witmotion RS232 USB Cable
In addition to the requirements above, OpenComposite will be needed for OpenVR games that do not have native OpenXR support.
- OpenXR Toolkit - OpenComposite (Optional)
Sim Racing Studio Premium Add-On Subscription
A Sim Racing Stuidio Premium Add-On Subscription is required to enable OpenXR Motion Compensation in Sim Racing Studio. A SRS Premium Add-On Subscription can be purchased here or from within SRS by going to SETUP > License and clicking the Premium purchase button. This add-on subscription enables SRS to continue development on new and experimental projects and provides additional features including:
- Joystick Telemetry Maker
- Premium Shaking Effects
- Mobile Companion to access SRS from Phone or Tablet
- Pro-Tune Profile Downloads
- Cloud Tune Sharing and Importing
- Intellitune WIzard for Motion Platforms
- Cloud Backup and Restore
Note: A SRS Base License is also a requirement as the SRS Premium Add-On Subscription is just an add-on to the Base License. You can find more information about the differences here.
OpenXR Motion Compensation
OpenXR Motion Compensation can be downloaded from here: https://github.com/BuzzteeBear/OpenXR-MotionCompensation/releases/
Two files can be found in the Assets section:
Click on the files to download them to your computer.
IMPORTANT: OpenXR Motion Compensation: OpenXR is primarily developed by Sebastian “BuzzteeBear” Veith with assistance from mbucchia. Please support Buzzteebear for his development of OpenXR Motion Compensation with any type of donation you can provide. You can utilize the support links below:
Sebastian “BuzzteeBear” Veith PayPal Donation Link: https://www.paypal.com/donate/?hosted_button_id=Q64DT2ADFCBU8
Support BuzzteeBear on GitHub: https://github.com/sponsors/BuzzteeBear
Feedback and assistance with OXRMC: oxrmc@mailbox.org
There would be no OXRMC without Buzzteebear. THANK YOU BUZZTEEBEAR!!
Please also support mbucchia and the development of OpenXR here: https://mbucchia.github.io/OpenXR-Toolkit/
NOTE: Sim Racing Studio does not develop or maintain OpenXR Motion Compensation or OpenXR Toolkit.
Witmotion WT901C (RS232) Sensor and Witmotion RS232 USB Cable
The Witmotion WT901C sensor and its required Witmotion RS232 USB Cable are utilized by SRS to know the precise movements of the motion platform. The specific model Witmotion sensor and cable are the only ones officially tested and supported.
The Witmotion sensor can be purchased from the following locations:
- Aliexpress link here. IMPORTANT: When purchasing from Aliexpress, different models will be available on the product detail page. Only the WT901C (RS232) + RS232 Cable have been verified to work with SRS Motion Compensation. Ensure you purchase the correct Witmotion sensor and cable. An image of the correct bundle that includes both the WT901C (RS232) sensor and RS232 Cable is below:

- Amazon link for the Witmotion WT901C (RS232) sensor can be found here and the link for the Witmotion RS232 USB Cable can be found here. NOTE: If purchasing the Witmotion Sensor or Cable from different Amazon country websites (ie. amazon.ca, amazon.uk.co, amazon.de, etc), ensure the exact model of the Witmotion Sensor and Cable are purchased. Images of the correct WT901C (RS232) sensor and RS232 Cable are below:


DISCLAIMER: Sim Racing Studio's support of OpenXR Motion Compensation is an experimental feature and might stop working if OpenXR Motion Compensation (OXRMC) ends development. Sim Racing Studio is not responsible for any expenses incurred related to the Sim Racing Studio Motion Compensation feature.
OpenXR Toolkit - OpenComposite
The goal of OpenComposite is to run applications built on the legacy OpenVR (predecessor of OpenXR), which typically require SteamVR, to use OpenXR instead. If you are planning to use OpenXR with OpenVR games, you will need to utilize Open Composite. Please visit this link to find out more about OpenComposite and how to install it on your system: https://mbucchia.github.io/OpenXR-Toolkit/opencomposite
This only required if the game you are playing does not provide native support for OpenXR.
NOTE: Sim Racing Studio does not develop or maintain OpenComposite.
Witmotion Sensor Installation
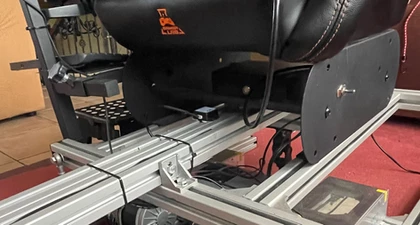
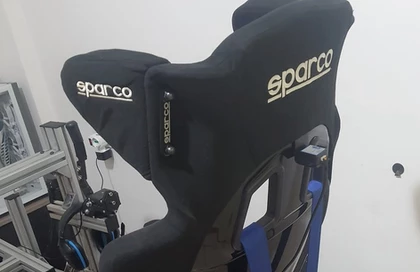
1) Place the Witmotion Sensor on your platform and tightly secure it. It should be mounted firmly on the platform. If the sensor is slightly loose, it could result in poor motion compensation. If using aluminum extrusion, M5 bolts will work, but will be a tight fit.
The Witmotion Sensor can be installed anywhere on your platform. However, the settings in this guide is based on a HORIZONTAL installation and the RS232 USB Cable is FACING FORWARD (the same direction your eyes are looking at towards the front of your platform). It is HIGHLY recommended to install the Witmotion Sensor this way as it will require the least amount of configuration later.
The Witmotion Sensor can be installed vertically or in other locations on the platform; however, some settings might need to be reversed depending on how you position the Witmotion Sensor. Details on how to reverse settings will be covered in the Configuring SRS Motion Compensation Settings section below.


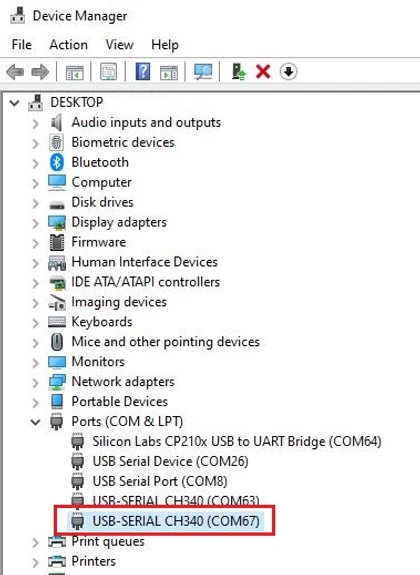
If you do not see a new CH340 device listed in Device Manager, install the necessary driver from here. Note: The COM port listed will vary depending on other devices installed on your PC
OXRMC Installation
The next step is to install OpenXR Motion Compensation (OXRMC).
Download the latest version of OXRMC named Install_OpenXR-MotionCompensation_<current_version>.exe from here
Run the Installer
Notes on OXRMC installation:
- Run the installation with Administrative Privileges (Run as administrator)
- Using a sub-directory of Program Files as installation target is recommended, especially for compatibility with WMR based headsets.
- Run the OXRMC installer using the same Windows account used for your games.
- When installing OXRMC, you might receive a Windows warning like the one below. Please click on the More info link and then the "Run Anyway" option.


Initial Sim Racing Studio Configuration
1. Ensure you have the latest version of Sim Racing Studio. You can download the latest version of Sim Racing Studio from the downloads page here. You must have version 2.27.12.0 or higher (check in SETUP > App).
2. Open Sim Racing Studio and go to SETUP > Motion Compensation
3. If OXRMC and the SRS Virtual Tracker are all installed correctly, you will see the Installed message in the Health Check section. If not, click the Refresh button to enable SRS to check again.


5. To calibrate the sensor to the neutral position of the platform, click on the Bullseye icons for Pitch and Roll to calibrate and save the settings.
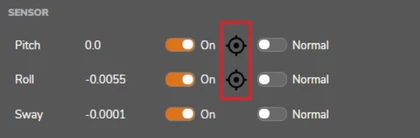
IMPORTANT: The Bullseye icons for Pitch and Roll will need to be calibrated anytime the platform has been moved or if the Witmotion sensor has not be utilized for a long period of time. This is to ensure the Witmotion sensor is level and ready before you launch OXRMC to avoid any misalignment for motion compensation. This is not needed every play session; only when a long period of non-use.
6. Skip the SENSOR section as it will be adjusted in the Adjusting Sim Racing Studio Motion Compensation Settings below.
7. In the SETTINGS section, in the Seated Height (mm) field, enter the number 1. OXRMC will handle the calculation of the height automatically; however, you will still need to at least enter the number 1 in the Seated Height (mm) field for Sim Racing Studio. 
IMPORTANT: Do not enter any value higher than 1 in the field or OXRMC will not compensate properly.
8. In the Installation field, if you have mounted the Witmotion Sensor vertically instead of horizontally on your motion rig, click the field and change it to Vertical. If you have mounted the Witmotion Sensor horizontally, leave it on Horizontal.

9. (For actuator platforms with horizontal surge actuators only) If you have a horizontal surge actuator, insert the stroke in millimeters in the Surge Horizontal Actuator Stroke (mm) field.

IMPORTANT: When finished making changes, click SAVE at the top right in Sim Racing Studio.

Configuring OXRMC Settings
Once you have OXRMC installed, Sim Racing Studio will detect it and assist with configuring the virtual tracker.
- Launch Sim Racing Studio
- Go to SETUP > Motion Compensation
- Click the Config button next to SRS OpenXR Tracker

- SRS is now set at the virtual tracker for OXRMC and should show as Configured.

- Continue to creating an activate and recalibrate center shortcut below.
Creating an Activate and Recalibrate Center Shortcut
To quickly activate and recalibrate center for OXRMC, please use the shortcut keys below:
The default shortcut to activate OXRMC is CTRL+INS
The detault shortcut to recalibrate center for OXRMC is CTRL+DEL
If these shortcuts need to be changed, it can be done so in the OpenXR-MotionCompensation.ini file file's fields below:
; GENERAL
; (re)activate and deactivate motion compensation
activate = CTRL+INS
; (re)set reference pose for tracker
center = CTRL+DEL
More information on creating keyboard shortcuts can be found in the Keyboard Shortcuts section below.
Calibrating the OXRMC Center of Rotation (COR)
In order for OXRMC to correctly compensation the VR image, you have to provide the information on where the Center of Rotation (COR) of your motion rig is positioned and which way is forward. This can be done with the following steps:
- Calculate, measure or estimate the distance between your headset and the Center of Rotation of your motion rig in forward/backward, up/down and left/right direction (This is typically near the bottom of the seat in the platform; however, it may be different based on the platform).
- Enter the offset values in the OpenXR-MotionCompensation.ini file
- Start the OpenXR game of your choice
- Ensure the motion platform is in a neutral position
- Sit in your your motion platform
- Put your HMD on and face forward (this will be the direction when accelerating/surging forward).
Note: Potential rotation of the HMD on the roll and pitch angle is ignored for the calculation - Issue the re-calibration center command by activating the
centershortcut. You can also do this implicitly by activating motion compensation if you haven't (re)calibrated since last loading of the configuration.
Note: You may have to invert some of the rotations/translations on the output side to get them compensated properly. For new users it's strongly recommended to use the Sim Racing Studio Joystick Feature and testing one axis at at time.
OXRMC Center of Rotation Save Location
The current position and orientation of the Center of Rotation (COR) is part of the configuration and can be saved to the (global 'OpenXR-MotionCompensation.ini' file or app-specific when created) config file.
When your satisfied with the current setting of the COR, you can set the config key use_cor_pos to 1 in the OpenXR-MotionCompensation.ini file usually located at "...\Users\*<Your_Username>*\AppData\Local\OpenXR-MotionCompensation".
This causes the COR position to be loaded from the config file when calibrating instead of being determined using the hmd position and the offset values.
Per OXRMC: Note that this functionality may not work with all HMD vendors. Setting up the playspace in the VR runtime configuration of your hmd might help to get this working correctly. Rumor has it that some HMDs need to be started/initialized at the exact same location for the playspace coordinates to be consistent in between uses.
Keyboard Shortcuts
Keyboard shortcuts can be setup in the OpenXR-MotionCompensation.ini file, usually located at "...\Users\*<Your_Username>*\AppData\Local\OpenXR-MotionCompensation" to activate/deactivate or re-calibrate motion compensation during game-play.
Note that all keys and values in the configuration file(s) are case sensitive. That means all keyboard shortcuts must only contain capital letters, numbers and/or underscores
shortcuts: can be used to configure shortcuts for different commands (See the OXRMC Keyboard Bindings at the bottom of this guide valid values):activate- turn motion compensation on or off. Note that this implicitly triggers the calibration action (center) if that hasn't been executed before.center- recalibrate the neutral reference pose of the trackertranslation_increase,translation_decrease- modify the strength of the translational filter. Changes made during runtime can be saved by using a save command (see below).rotation_increase,rotation_decrease= see above, but for rotational filteroffset_forward,offset_back,offset_up,offset_down,offset_right,offset_left- move the center of rotation (cor) for a virtual tracker. The directions are aligned with the forward vector set with thecentercommand. Changes made during runtime can be saved by using a save command (see below).rotate_right,rotate_left- rotate the aforementioned forward vector aroung the gravitational (yaw-)axis. Note that these changes cannot be saved. Therefore changing the offset position AFTER rotating manually and saving the offset values will result in the cor being a different offset position after relaoding those saved values.toggle_overlay- (de)activate graphical overlay displaying the reference tracker position(s) (See Graphical overlay for details).toggle_cache- change between calculated and cached eye positions.save_config- write current filter strength and cor offsets to global config filesave_config_app- write current filter strength and cor offsets to application specific config file. Note that values in this file will precedent values in the global config file.
Launching OXRMC
- Make sure the game your using OXRMC motion compensation with support OpenXR -or- you are using OpenComposite
- Start the game
- Center the in-app view
- Bring your motion platform to neutral position
- Reset the ingame view if necessary
- Press the
activateshortcut (CTRL + INSERT by default). This implicitly sets the neutral reference pose for the tracker
- If necessary you can recalibrate the tracker by pressing the
centershortcut (CTRL + DEL by default) while the motion rig is in neutral position. - You can increase or decrease the filter strength of translational and rotational filters in the OpenXR-MotionCompensation.ini of the image is swimming or laggy.
OXRMC Graphic Overlay
You can enable/disable the overlay using the toggle_overlay shortcut. It displays a marker in your headset view for:
- The current neutral position of the reference tracker. Note that the position of the marker does not represent the Center of Rotation position prior to calibration
- For the SRS virtual tracker, the neutral position corresponds to the center of rotation currently configured. The marker uses the following color coding:
- blue points upwards
- green points forward
- red points to the right
- if blue and red are pointing in the opposite direction, try setting
upside_downto 1 in thestartupsection of the config file of the corresponding application (or check if it is set to 1 inadvertently).
- For the SRS virtual tracker, the neutral position corresponds to the center of rotation currently configured. The marker uses the following color coding:
- The SRS virtual tracker position, if motion compensation is currently active. This marker uses:
- cyan instead of blue
- yellow instead of green
- magenta instead of red
Adjusting SRS Motion Compensation Settings
SRS Motion Compensation should now be working. You will now need to finalize your settings and test motion compensation in Sim Racing Studio.
You will be observing how well the motion compensation is working in VR while at the same time adjusting the settings in the SENSOR section of the Motion Compensation page below.

During testing, you will need to turn Off the Roll, Sway, and Surge motion compensation settings. Do this by using the On / Off switches next to each axis: 
During testing, you might need to REVERSE an axis in motion compensation due to the orientation of the Witmotion Sensor. Do this by using the Normal / Reversed switches for each axis: 
The Factor sliders are utilized to fine tune the amount of motion compensation used on the Sway and Surge axis. For platforms that do not have dedicated sway movement/actuators, sway is converted into roll. For platforms that do not have dedicated surge movement/actuators, surge is converted into pitch.
Sway Factor is the amount of motion compensation that is applied to the Sway axis. The higher the amount, the more compensation is utilized. This slider can be reduced to negate any potential over or under compensation which will result in inaccurate movements in the VR image for Sway. If the sway movement is not matching what is seen in the VR image, try reducing the Sway Factor.

Note: SRS Sway Motion Compensation only applies to Roll Sway. Linear Sway used by Double-Traction Loss / Full Sway actuator platforms is not compensated at this time.
Surge is the amount of motion compensation that is applied to the surge axis. The higher the amount, the more compensation is utilized. Similar to sway, if the surge movement is not matching what is seen in the VR image, try reducing the Surge Factor.
Horizontal Factor (For actuator platforms with horizontal surge actuators only) is the amount of motion compensation that is applied to the horizontal surge axis similar to the Sway Factor and Surge Factor as listed above. If the surge actuator is reversed on your platform, utilize the Normal / Reversed button to reverse the surge motion compensation.

IMPORTANT: When finished making changes, click SAVE at the top right in Sim Racing Studio.

SRS Keyboard Shortcuts
You can program Sim Racing Studio shortcuts for most of the SRS Motion Compensation commands. Click on the Keyboard icon on top right of the Motion Compensation page in Sim Racing Studio. It is suggested to set a Keyboard button for the ‘Motion Compensation Switch’. This will make it easy to stop Motion Compensation in Sim Racing Studio so you can compare the difference with and without it working.
OXRMC Keyboard Bindings
To combine multiple keys for a single shortcut, ensure they are separated by '+' with no spaces in between the key descriptors.
List of supported shortcut key names:
| Name | Key |
|---|---|
SHIFT | shift key |
CTRL | ctrl key |
ALT | alt key |
LSHIFT | left shift key |
RSHIFT | right shift key |
LCTRL | left ctrl key |
RCTRL | right ctrl key |
LALT | left alt key |
RALT | right alt key |
0- 9 | numerical key |
A- Z | alphbetical key |
BACKQUOTE | `~ key (US) |
TAB | tabulator key |
CAPS | caps lock key |
PLUS | + key (any country) |
MINUS | - key (any country) |
OPENBRACKET | [{ key (US) |
CLOSEBRACKET | ]} key (US) |
SEMICOLON | ;: key (US) |
QUOTE | '" key (US) |
BACKSLASH | \| key (US) |
COMMA | , key (any country) |
PERIOD | . key (any country) |
SLASH | /? key (US) |
BACK | backspace key |
CLR | clr key |
RETURN | return key |
ESC | esc key |
SPACE | space key |
LEFT | cursor left key |
UP | cursor up key |
RIGHT | cursor right key |
DOWN | cursor down key |
INS | ins key |
DEL | del key |
HOME | home key |
END | end key |
PGUP | page up key |
PGDN | page down key |
NUM0 | 0 key on NUM |
NUM1 | 1 key on NUM |
NUM2 | 2 key on NUM |
NUM3 | 3 key on NUM |
NUM4 | 4 key on NUM |
NUM5 | 5 key on NUM |
NUM6 | 6 key on NUM |
NUM7 | 7 key on NUM |
NUM8 | 8 key on NUM |
NUM9 | 9 key on NUM |
NUMLOCK | numlock key |
NUMDIVIDE | / key on NUM |
NUMMULTIPLY | * key on NUM |
NUMSUBTRACT | - key on NUM |
NUMADD | + key on NUM |
NUMDECIMAL | . key on NUM |
NUMSEPARATOR | separator key on NUM |
F1 | F1 key |
F2 | F2 key |
F3 | F3 key |
F4 | F4 key |
F5 | F5 key |
F6 | F6 key |
F7 | F7 key |
F8 | F8 key |
F9 | F9 key |
F10 | F10 key |
F11 | F11 key |
F12 | F12 key |
PRTSC | print screen key |
SCROLL | scroll lock key |
PAUSE | pause key |
SELECT | select key |
PRINT | print key |
HELP | help key |
EXEC | execute key |
GAMEPAD_A | A button on gamepad |
GAMEPAD_B | B button on gamepad |
GAMEPAD_X | X button on gamepad |
GAMEPAD_Y | Y button on gamepad |
GAMEPAD_RIGHT_SHOULDER | right shoulder button on gamepad |
GAMEPAD_LEFT_SHOULDER | left shoulder button on gamepad |
GAMEPAD_LEFT_TRIGGER | left trigger button on gamepad |
GAMEPAD_RIGHT_TRIGGER | right trigger button on gamepad |
GAMEPAD_DPAD_UP | digital pad up on gamepad |
GAMEPAD_DPAD_DOWN | digital pad down on gamepad |
GAMEPAD_DPAD_LEFT | digital pad left on gamepad |
GAMEPAD_DPAD_RIGHT | digital pad right on gamepad |
GAMEPAD_START | start button on gamepad |
GAMEPAD_VIEW | view button on gamepad |
GAMEPAD_LEFT_THUMBSTICK_BUTTON | left thumbstick pressed on gamepad |
GAMEPAD_RIGHT_THUMBSTICK_BUTTON | right thumbstick pressed on gamepad |
GAMEPAD_LEFT_THUMBSTICK_UP | left thumbstick up on gamepad |
GAMEPAD_LEFT_THUMBSTICK_DOWN | left thumbstick down on gamepad |
GAMEPAD_LEFT_THUMBSTICK_RIGHT | left thumbstick left on gamepad |
GAMEPAD_LEFT_THUMBSTICK_LEFT | left thumbstick right on gamepad |
GAMEPAD_RIGHT_THUMBSTICK_UP | right thumbstick up on gamepad |
GAMEPAD_RIGHT_THUMBSTICK_DOWN | right thumbstick down on gamepad |
GAMEPAD_RIGHT_THUMBSTICK_RIGHT | right thumbstick left on gamepad |
GAMEPAD_RIGHT_THUMBSTICK_LEFT | right thumbstick right on gamepad |
OXRMC Troubleshooting
For troubleshooting assitance with OXRMC, please see the article here: https://simracingstudio.freshdesk.com/support/solutions/articles/35000219657-openxr-motion-compensation-troubleshooting