IMPORTANT: If you are using Sim Racing Studio and a Thanos AMC Controller, use the guidance here to get started with your platform: Sim Racing Studio / PT Actuator Quick Start Guide.
This is a collection of the resources on setting up an actuator platforms for use with Sim Racing Studio. They can be found in the following order below:
Thanos Resources
Thanos AMC-AASD15A 4DOF+TL+Surge Servo Controller Manual
Thanos Firmware Update
E-Stop Button Setup
Actuator to THANOS port connection
AASD-15A Servo Settings
Thanos Settings for a 6DOF PT Actuator Simracing Platform
Triggering Actuator Re-calibration with the Exit + Down Buttons
Updating the FTDI (VCP) Driver
Electromagnetic Interference (EMI) Issues
EMI Filter Installation
Wiring an EMI Filter to an AMC-AASD15A Servo
How I solved (?) the EMI problem in my SimRig by Luis Blando
Uninterruptible Power Supply (UPS) and Actuators
Mounting Triple Monitors to a Linear Actuator Platform
PT Actuator Resources
Sim Racing Studio / PT Actuator Quick Start Guide
Centering Platform when Parked with Double-Traction Loss
Lubrication of Actuators, Linear Bearings, and Flange Mount Bearings
Helpful Videos
PT Actuator images for wiring the AASD1A Servos
Prosimu Resources
Jeff Weaver's Guides & Resources
Thanos Resources
Thanos Motion Website - Purchase the Thanos AMC Controller and other products
Thanos Discord Channel - For Thanos Controller and support software discussion in Discord
Thanos 6DOF motion sim electronics YouTube Channel - Thanos videos on setup, functions, and updates
Thanos Manual and Datasheets - Contains previous other manuals and data sheets
Technical Manual for AASD Series Servo Drive - Section 6.2 contains Alarm Code (AL) definitions
Thanos4U servo motion controller - Contains information on features of the Thanos4U controller
Thanos AMC-AASD15A 4DOF+TL+Surge Servo Controller Manual
Link to the latest Thanos AASD15A Servo Control Manual and other data sheets click here.
Thanos Firmware Update
A Step-By-Step Guide on updating the Thanos firmware can be found here.
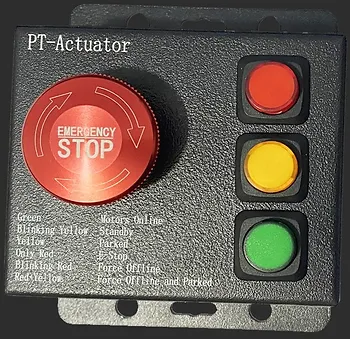
E-Stop Button Setup
Connect the E-Stop to the Thanos controller via an Ethernet Cable
For E-Stops with LEDs lights (green/yellow/red), set the #2 DIP Switch to ON which will enable the LEDs
Video explaining E-Stop functionality here.
Video on Open vs Closed E-Stop Setup here.
Video of multiple E-Stops on the AMC-AASD15A here.
Actuator to THANOS port connection:

AASD-15A Servo Settings:
Push MOD until you see Pn000. This enters the parameter mode. Change and check these settings on all motors:
Pn8 = 300 - Max peak torque % CW
Pn9 = -300 - Max peak torque % CCW
Pn51 = 3000 - Max servomotor speed in RPM
Pn98 = 20 - Pulse Multiplier (electronics gear)
Pn109 = 1 - Smoothing (1=Fixed smoothing, 2=S-Shaped smoothing)
Pn110 = 30 - Smoothing Filter Time
Pn113 = 20 - Feedforward %
Pn114 = 10 - Feedforward Filter Time (ms)
Pn115 = 100 - Gain %
Pn24 = 100 - Torque level for home calibration
Pn52 = 1
Pn60 = 2
Pn61 = 6
Thanos Settings for a 6DOF PT Actuator Simracing Platform
(Click Image to Enlarge)
Triggering Actuator Re-calibration with the Exit + Down Buttons
Updating the FTDI (VCP) Driver
1) Go to https://ftdichip.com/drivers/vcp-drivers/
2) Select the correct file for your Operating System. For Windows 10 64-bit, it would be the one highlighted below. Note: It may update in the future.

3) Download the file
4) Extract the file by double clicking on it and moving the files to a new folder on your computer. Be sure to remember where you extract the files.
5) Go to Device Manager and select the COM port that is used for the Thanos controller. It can be any COM port, but it usually appears as 'USB Serial Port (COM8):

6) Right click on the USB Serial Port (COM8) and select 'Update driver'
7) When the window opens, select the second option to 'Browse my computer for drivers'

8) Browse your computer for the folder you extracted the driver files and choose the root folder (you don't need to select the sub-folders)
9) Click Next
10) Your FTDI (VCP) driver is now updated.
Electromagnetic Interference (EMI) Issues
EMI issues on an actuator platform can manifest themselves in numerous ways. The most common are:
Unexpected disconnections from the Thanos controller during a race or flight which parks the platform
VR headsets will go gray and lose tracking or video
Force feedback devices will suddenly become disconnected
USB devices randomly disconnect
EMI issues can be a result of a number of different issues including but not limited to:
EMI originating from the actuator servo drivers or motors
Unshielded cables
Power cables in close proximity to each other
Cables laying on top of each other rolled into tight loops creating an antenna
Ground loops
Improper grounding of the actuator servos and/or platform
Noise in the electrical system that does not originate from the actuator platform
How to solve EMI issues can depend greatly on your actuator platform setup; however, some solutions include:
Install an EMI Filter
Ensure all cables are properly shielded and grounded both at the servo drivers AND the servo motors
Ensure the wall socket is properly grounded
Ensure the platform is grounded wherever electronics are mounted
Avoid creating a ground loop by having all electronics used by the platform share the same wall socket. This includes your PC, sim gear, monitors, and actuators.
Use Ferrite Rings
Keep VR cables completely away from all other cables. Using a ceiling mounted pulley system works best.
Use high quality powered USB hubs
Use an EMI mat under the platform
EMI Filter Installation
Installing an EMI Filter is the critical first step in eliminating EMI issues in an actuator platform. Utilize the Thanos video below.
Wiring an EMI Filter to an AMC-AASD15A Servo:
How I solved (?) the EMI problem in my SimRig
A detailed guide on how to resolve EMI issues has been created by Luis Blando which can be found here. Additional Guide: EMI Filter Guide by John Spanos
Uninterruptible Power Supply (UPS) and Actuators
If the power is cut off unexpectedly to the Thanos controller which is providing guidance to the actuator -OR- power is cut directly to the servo drivers, the servo motor is no longer able to hold the slider within the actuator in place. This will result in the actuator lowering violently which could lead to potential damage to the actuator and/or personal injury. The Uninterruptible Power Supply (UPS) and Actuators FAQ/Guide will provide additional information on utilizing a UPS for your actuator platform can be found here.
Mounting Triple Monitors to a Linear Actuator Platform Resources
PT Actuator Resources
IMPORTANT: Sim Racing Studio / PT Actuator Quick Start Guide
Follow the guidance in the SRS Quick Start Guide to get started with your platform.
Centering Platform when Parked with Double-Traction Loss
For PT Actuator 6DOF platforms with Double-Traction Loss (ie. Full Yaw / Sway via two horizontal actuators), the Standby position within the Thanos controller must be set to 50%. Do not change the value within the Thanos controller to center the bottom of the platform. Note: The measurements provided by PT Actuator (295mm from the edge of the bracket to the edge of the platform) may not be exactly what is needed once your platform is assembled.
If the bottom platform is not centered when parked, you must manually reposition the Double-Traction Loss actuator brackets. Measure the distance of how far the bottom platform is out of alignment and reposition the horizontal Traction Loss actuator brackets accordingly.
Lubrication of Actuators, Linear Bearings, and Flange Mount Bearings
It is generally recommended to use Super Lube Synthetic Grease or similar NLGI Grade 2 lubricant for the internals of the actuators, linear bearings, and flange mount bearings if servicing is required.
Helpful Videos
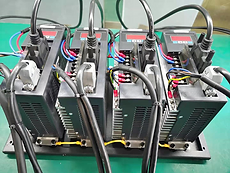
PT Actuator images for wiring the AASD1A Servos


Prosimu Resources
Jeff Weaver's Guides FAQs and Tutorials
Star Wars Squadrons / Joystick Motion Tuning for Sim Racing Studio
HOTAS and Rudder / Joystick Motion Tutorial for Sim Racing Studio
Steering Wheel and Pedals / Joystick Motion Tutorial for Sim Racing Studio