SRS OpenVR Motion Compensation will remove a motion platform movements by changing the communicated position of a VR Headset before the VR image is rendered. This will allow the VR image to remain firmly in the seat or cockpit when racing or flying instead of being moved outside of the car or cockpit when the motion platform has a large amount of movement. This will increase the immersion and improve the actual feeling of motion while in VR.
This guide provides information on how to install, setup, and use Sim Racing Studio Motion OpenVR Compensation. Topics include:
Supported VR Headsets
Requirements
Setup Guide
Witmotion Sensor Installation
SteamVR Installation
OVRMC Installation
Initial Sim Racing Studio Configuration
SteamVR Add-Ons and Overlays
Launching OVRMC
Configuring OVRMC Settings
Enabling Motion Compensation
Adjusting SRS Motion Compensation Settings
LPF Beta values and DEMA sample Settings
Keyboard Shortcuts
Tuning Motion Compensation
Pre-Launch Checklist <- IMPORTANT: Required every time SteamVR or OVRMC is restarted
Example Settings
If you have any issues using Sim Racing Studio Motion Compensation, please use the troubleshooting here.
Note: SRS OpenVR Motion Compensation will compensate platform movement on the Pitch, Roll, Sway(Roll), and Surge axis for actuator and non-actuator platforms. Yaw(Tracton Loss), Linear Sway(Double Traction Loss), and Heave are not compensated.
Supported VR Headsets
SRS OpenVR Motion Compensation has been verified to work with the following Virtual Reality (VR) Head Mounted Displays (HMD). If your HMD is not listed, SRS Motion Compensation may still work.
Windows Mixed Reality (WMR) Headsets (G2, Odyssey+, etc)
Pimax 5K and 8KX
Oculus Quest 2 (with Oculus link in SteamVR)
Oculus Rift S and CV1
Valve Index (requires OVRMC 0.3.6)
Requirements
The following items are required to use SRS OpenVR Motion Compensation:
SRS Premium Add-On Subscription for the SRS Base License
OpenVR Motion Compensation (OVRMC)
SteamVR (Non-Beta Version)
Witmotion WT901C (RS232) Sensor and Witmotion RS232 USB Cable
SRS Premium Add-On Subscription
A SRS Premium Add-On Subscription is required to enable OpenVR Motion Compensation in Sim Racing Studio. A SRS Premium Add-On Subscription can be purchased here or from within SRS by going to SETUP > License and clicking the Premium purchase button. This add-on subscription enables SRS to continue development on new and experimental projects and provides additional features including:
Joystick Telemetry Maker
Premium Shaking Effects
Mobile Companion to access SRS from Phone or Tablet
Pro-Tune Profile Downloads
Cloud Tune Sharing and Importing
Intellitune WIzard for Motion Platforms
Cloud Backup and Restore
Note: A SRS Base License is also a requirement as the SRS Premium Add-On Subscription is just an add-on to the Base License. You can find more information about the differences here.
OpenVR Motion Compensation
OpenVR Motion Compensation (OVRMC) is an OpenVR driver that allows the ability enable motion compensation within SteamVR. Download the latest version from here. OVRMC works by utilizing its OpenVR driver which hooks into the HMD device driver and allows OVRMC to modify any pose/positional updates coming from the HMD before they reach the OpenVR runtime used by SteamVR. The full OpenVR Motion Compensation website can be found here for additional information.
OpenXR is not supported at this time.
IMPORTANT: Due to the nature of this solution, the OVRMC driver may break whenever Valve decides to update the driver-side OpenVR API or it is no longer updated by the community.
SteamVR
OVRMC requires SteamVR to work as it hooks into SteamVR's OpenVR API to adjust the positioning of the image seen in the VR HMD. OVRMC will not work without SteamVR. More information on SteamVR can be found here.
Note: The current SteamVR Beta can cause the OVRMC main menu to not appear. Use the normal SteamVR version instead. Instructions on how to uninstall the beta can be found in troubleshooting at the end of this guide.
Witmotion WT901C (RS232) Sensor and Witmotion RS232 USB Cable
The Witmotion WT901C sensor and its required Witmotion RS232 USB Cable are utilized by SRS to know the precise movements of the motion platform. The specific model Witmotion sensor and cable are the only ones officially tested and supported.
The Witmotion sensor can be purchased from the following locations:
Aliexpress link here. IMPORTANT: When purchasing from Aliexpress, different models will be available on the product detail page. Only the WT901C (RS232) + RS232 Cable have been verified to work with SRS Motion Compensation. Ensure you purchase the correct Witmotion sensor and cable. An image of the correct bundle that includes both the WT901C (RS232) sensor and RS232 Cable is below:

Amazon link for the Witmotion WT901C (RS232) sensor can be found here and the link for the Witmotion RS232 USB Cable can be found here. NOTE: If purchasing the Witmotion Sensor or Cable from different Amazon country websites (ie. amazon.ca, amazon.uk.co, amazon.de, etc), ensure the exact model of the Witmotion Sensor and Cable are purchased. Images of the correct WT901C (RS232) sensor and RS232 Cable are below:

 DISCLAIMER: Sim Racing Studio Motion Compensation is an experimental feature and might stop working if there are updates to SteamVR or if OpenVR Motion Compensation (OVRMC) ends development. Sim Racing Studio is not responsible for any expenses you incurred related to the Sim Racing Studio Motion Compensation feature.
Setup Guide
SRS OpenVR Motion Compensation should work with any VR HMD as long as you are using SteamVR for rendering the VR image. However, there can always be issues in compatibility with the various number of headset available and their proprietary software used to communicate with SteamVR.
NOTE: Sim Racing Studio is unable to guarantee support resolution for the experimental feature of motion compensation. If support is needed, join the Sim Racing Studio OpenVR Motion Compensation Discord channel here. If additional support is required, please book an appointment with the Sim Racing Studio VIP Service here.
This Setup Guide will cover the following topics:
- Witmotion Sensor Installation
- SteamVR Installation
- OVRMC Installation
- Sim Racing Studio Initial Configuration
- SteamVR Add-Ons and Overlays
- Launching OVRMC
- Configuring OVRMC Settings
- Enabling Motion Compensation
- Configuring SRS Motion Compensation Settings
- LPF Beta values and DEMA sample Settings
- Keyboard Shortcuts
- Testing the SRS Motion Compensation
Witmotion Sensor Installation
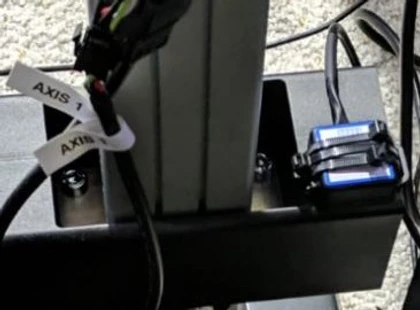
1) Place the Witmotion Sensor on your platform and tightly secure it. It should be mounted firmly on the platform. If the sensor is slightly loose, it could result in poor motion compensation. If using aluminum extrusion, M5 bolts will work, but will be a tight fit.
The Witmotion Sensor can be installed anywhere on your platform. However, the settings in this guide is based on a HORIZONTAL installation and the RS232 USB Cable is FACING FORWARD (the same direction your eyes are looking at towards the front of your platform). It is HIGHLY recommended to install the Witmotion Sensor this way as it will require the least amount of configuration later.
The Witmotion Sensor can be installed vertically or in other locations on the platform; however, some settings might need to be reversed depending on how you position the Witmotion Sensor. Details on how to reverse settings will be covered in the Configuring SRS Motion Compensation Settings section below.


SteamVR Installation
If you do not already have SteamVR, go here to install it. Click on the 'Play Game' button to begin the installation process. SteamVR works with Vive, Rift, Windows Mixed Reality, and other PC VR HMDs.
Note: SteamVR is required for OVRMC to work.
OVRMC Installation
The next step is to install OpenVR Motion Compensation (OVRMC).
Download the latest version of OVRMC from here (currently v0.3.6).
Run the Installer.
The installer will automatically install all the files needed for OVRMC to work with SRS Motion Compensation.
Note: When installing OVRMC, you might receive a Windows warning. Please proceed with the "Run Anyway" option.
Initial Sim Racing Studio Configuration
1. Ensure you have the latest version of Sim Racing Studio. You can download the latest version of Sim Racing Studio from the downloads page here.
2. Open Sim Racing Studio and go to SETUP > Motion Compensation
3. If SteamVR, OVRMC, and the SRS Virtual Tracker are all installed correctly, you will see the Installed message in the Health Check section. If not, click the Refresh button to enable SRS to check again.
 If one of the items does not show Installed, repeat the install process in the previous sections or refer to the Troubleshooting section at the bottom of the guide.
4. To verify if the Witmotion Sensor is working properly in SRS, there should be values other than 0.0 next to Pitch, Roll, or Sway that change even when at a rest as seen in the image below:

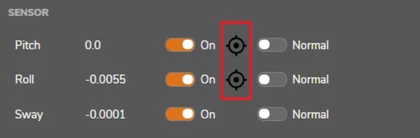
IMPORTANT: The Bullseye icons for Pitch and Roll will need to be calibrated anytime the platform has been moved or if the Witmotion sensor has not be utilized for a long period of time. This is to ensure the Witmotion sensor is level and ready before you launch OVRMC to avoid any misalignment for motion compensation.
6. Skip the SENSOR section as it will be adjusted in the Adjusting Sim Racing Studio Motion Compensation Settings below.
7. In the SETTINGS section, in the Seated Height (mm) field, enter the distance in millimeters from the bottom of your seat (under the pads) to your eye level. This helps in determining the offset of how high you are sitting and where the HMD will be located. If a measurement is unobtainable, utilize the default of 1000 since it will work in most instances. The value range can be from 1 to 1200.

8. In the Installation field, if you have mounted the Witmotion Sensor vertically instead of horizontally on your motion rig, click the field and change it to Vertical. If you have mounted the Witmotion Sensor horizontally, leave it on Horizontal.

9. (For actuator platforms with horizontal surge actuators only) If you have a horizontal surge actuator, insert the stroke in millimeters in the Surge Horizontal Actuator Stroke (mm) field.

IMPORTANT: When finished making changes, click SAVE at the top right in Sim Racing Studio.

SteamVR Add-Ons and Overlays
Now that the Witmotion Sensor and OVRMC is successfully installed, you must verify that OVRMC and Sim Racing Studio are active in the SteamVR Add-Ons and Startup Overlay Apps. You can do this now or later when you are about to Configure the OVRMC Settings below.
Open SteamVR
Go to Settings
Go to Startup / Shutdown
Select MANAGE ADD-ONS
Make sure 00vrmotioncompensation and simracingstudio are listed and shown as ON. Note: OVRMC in SteamVR shows up at 00vrmotioncompensation and SRS Motion Compensation shows as simracingstudio.
Next select CHOOSE STARTUP OVERLAY APPS
Ensure that VR Motion Compensation is turned On

If everything has been setup correctly, you should see a SRS Virtual Tracker (blue hexagon with a T) listed as a tracking device in the SteamVR window as shown below.

Launching OVRMC
There are two options on how to configure the settings within SteamVR for OVRMC:
Option 1) Utilize a VR controller while in SteamVR to make changes to OVRMC
Option 2) Utilize a startdesktopmode.bat file that will allow you to make adjustments to OVRMC on your desktop instead of in VR. (This method has been reported to often not work or crash SteamVR. It is HIGHLY recommended to use Option 1)
Both methods will still require you to wear your HMD to see the Virtual Tracker in VR. The choice only determines how you will interact with OVRMC when making the changes either with Option 1 by using a VR controller while in VR or with Option 2 by using your mouse and keyboard on your desktop while in VR.
Note: Due to the buggy nature of the startdesktopmode.bat file's tendency to crash SteamVR, its recommended to utilize Option 1 when possible.
Option 1:
1) Launch SteamVR and activate your VR controller
2) Use the menu button on your controller to access the SteamVR Dashboard
3) Select the GEAR icon in the bottom left to launch OVRMC
IMPORTANT: You will need to initially launch OVRMC like this EVERYTIME you want to use SRS Motion Compensation.
4) Proceed to Configuring OVRMC Settings

Option 2:
1) Go to the install location of OVRMC which is located at: C:\Program Files\OpenVR-MotionCompensation
2) Open the file "C:\Program Files\OpenVR-MotionCompensation\startdesktopmode.bat"
IMPORTANT: It is strongly suggested that you make a shortcut on your desktop to this file as you will need to run this file EVERYTIME you want to use SRS Motion Compensation.
Note: Though easier to launch, the .bat file can be buggy. If SteamVR continues to crash, try Option 1 instead.
4) Proceed to Configuring OVRMC Settings
Configuring OVRMC Settings
1) Select ‘SimRacingStudioVirtualTracker 1.0.0.1 (Tracker)' as your reference tracker if it’s not already selected.

2) Select the Settings button in the lower right to begin adjustment of the Virtual Tracker
3) When using Option 2, put on your VR HMD if you have not yet done so.
4) Once in SteamVR, you will need to exit SteamVR Home if active to see the Virtual Tracker.
a) Use the Menu button on your controller to access the SteamVR Dashboard
b) Select the Menu icon in the Bottom Left (3 horizontal lines)
c) Select EXIT STEAMVR HOME
d) Close the SteamVR Dashboard
You are now in an open VR space with the OpenVR Motion Compensation Settings menu in front of you with the Virtual Tracker somewhere around you. 
The Virtual Tracker (which is a Blue, Red, and Green Cross) will be located somewhere in this virtual space and you must look around to find it. It might be far behind, above, or below you. Here is how it appears far away over your left shoulder when looking back: 
Here is the Virtual Tracker very far away below you (Red arrow is pointing to it - Click image to enlarge):
This is the Virtual Tracker directly in front of you:
Note: If you are unable to locate the Virtual Tracker, go to Sim Racing Studio and repeat Step #5 in the Initial Sim Racing Studio Configuration section. This should place the Virtual Tracker nearby.
The SRS Virtual Tracker represents a center of rotation on you platform in order to calculate how to compensate for the change the position of your HMD when your platform moves. This guide will utilize the bottom of your seat as the center of rotation.
The center of the Virtual Tracker (where all 3 lines meet in the middle shown in the image below via the large red arrow) should be placed at the height of the bottom of your seat. This ensures it will work correctly based on the measurement of the Seated Height (mm) settings from Step #7 in the Initial Sim Racing Studio Configuration section.
The Virtual Tracker should also be placed in the middle of where your body is positioned so the Green Vertical Y lines goes directly through the center of your body out the top of your head.
To move the Virtual Tracker, you will utilize the + or - buttons next to X, Y, Z, and Yaw in the Offsets for Virtual Driver section. Pitch and Roll should not be needed unless the WitMotion Sensor is mounted at an angle. 
X is left and right. Y is up and down. Z is forward and backwards. Yaw rotates the Virtual Tracker.
Note: The direction the Virtual Tracker moves for X and Y may not be straight forward/backward left/right as it might be moving at an angle relative to your position; however, in general the direction will still follow the X and Z axis.
Note: You can hold the buttons down continuously to change the values (which is very slow) or manually enter positive or negative values to quickly move the Virtual Tracker a large distance in VR space. You can change the values in VR by clicking on the number and a virtual keyboard will appear to make the change. 
 As you change these values, the SRS Virtual Tracker will move in VR space.
To place the Virtual Tracker correctly, use the following guidance:
The BLUE arrow (Z) should point directly FORWARD towards the front of the motion platform, directly through the center of your body, with the center of the Virtual Tracker level with the Bottom of your Seat.
Rotate the Yaw axis until the Blue arrow (Z) is pointed FORWARD towards the front of your platform.
The RED arrow (X) should point to the LEFT, directly through the center of your body, with the center of the Virtual Tracker level with the Bottom of your Seat
The GREEN arrow (Y) should point straight UP, directly through the center of your body, with the center of the Virtual Tracker level with the Bottom of your Seat.
The final position of the Virtual Tracker should have its center at the bottom of your seat, centered in your body, with the Blue arrow pointed forward.
This is an image of the Virtual Track when looking straight down in VR in the final position (Note: It is extremely difficult to get a full 2D image in VR, but take note of the floor grid-line at the Blue arrow (Z) pointing forward). 
This is how the Virtual Tracker looks when looking straight down in iRacing with the Blue arrow pointed forward in the correct position with the VR Dashboard active. 
This is how the Virtual Tracker looks when looking down and to the left in iRacing with the Red arrow pointed to the left in the correct position with the VR Dashboard active. 
This is how the Virtual Tracker looks when looking straight up in iRacing with the Green arrow pointed up in the correct position with the VR Dashboard active. 
The position of the Virtual Tracker will be saved automatically as you make the adjustments, so it only have to be done once.
LPF Beta values and DEMA sample Settings
If your LPF Beta values are different than 1.0000, change them now to 1.0000 as this is the default setting.
If your DEMA sample values are not 2, change them now to 2 as this is the default setting.
These values are utilized for physical trackers like the Valve Index Controller or HTC Vive Tracker and should not be needed for the Virtual Tracker. However, if there are issues of a swimming or laggy image, they might need to be adjusted. See the Troubleshooting section at the bottom of this guide for more information.
Keyboard Shortcuts
Once all the settings are complete in OVRMC, it is suggested you set hotkeys. You can set keyboard hotkeys for the "Reset Reference pose" shortcut to the same key as your VR center/reset keybindings in your games so it will all reset at the same time when needing to recenter/calibrate your VR image. You can also set a Keyboard hotkey for enabling motion compensation. This can be done once in a game and before entering a vehicle. 
When you are done making changes in Settings, select the back arrow in the upper left next to Settings to head back to the main menu in OVRMC.

Enabling Motion Compensation
To enable Motion Compensation, first check the box next to Enable Motion Compensation:
Next, click the Apply button: 
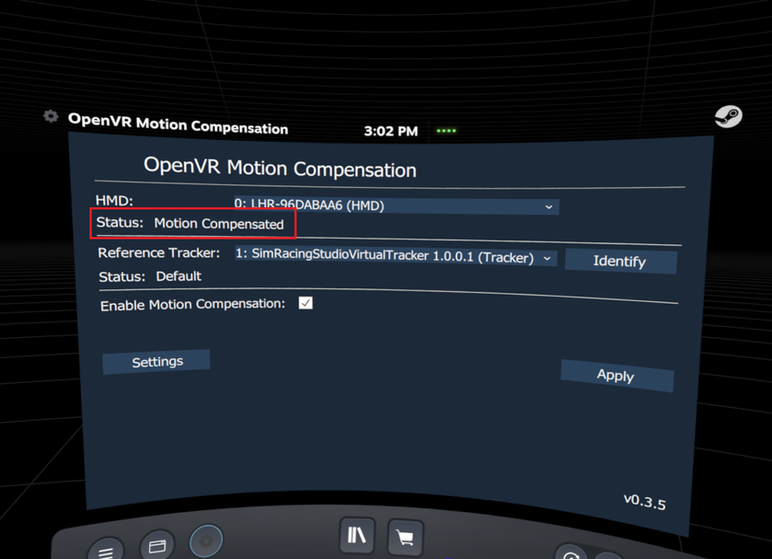
When active, you will see the message "Motion Compensated" in the HMD Status field:
Adjusting SRS Motion Compensation Settings
SRS Motion Compensation should now be working. You will now need to finalize your settings and test motion compensation in Sim Racing Studio.
You will be observing how well the motion compensation is working in VR while at the same time adjusting the settings in the SENSOR section of the Motion Compensation page below.

During testing, you will need to turn Off the Roll, Sway, and Surge motion compensation settings. Do this by using the On / Off switches next to each axis: 
During testing, you might need to REVERSE an axis in motion compensation due to the orientation of the Witmotion Sensor. Do this by using the Normal / Reversed switches for each axis: 
The Factor sliders are utilized to fine tune the amount of motion compensation used on the Sway and Surge axis. For platforms that do not have dedicated sway movement/actuators, sway is converted into roll. For platforms that do not have dedicated surge movement/actuators, surge is converted into pitch.
Sway Factor is the amount of motion compensation that is applied to the Sway axis. The higher the amount, the more compensation is utilized. This slider can be reduced to negate any potential over or under compensation which will result in inaccurate movements in the VR image for Sway. If the sway movement is not matching what is seen in the VR image, try reducing the Sway Factor. 
Note: SRS Sway Motion Compensation only applies to Roll Sway. Linear Sway used by Double-Traction Loss / Full Sway actuator platforms is not compensated at this time.
Surge is the amount of motion compensation that is applied to the surge axis. The higher the amount, the more compensation is utilized. Similar to sway, if the surge movement is not matching what is seen in the VR image, try reducing the Surge Factor.
Horizontal Factor (For actuator platforms with horizontal surge actuators only) is the amount of motion compensation that is applied to the horizontal surge axis similar to the Sway Factor and Surge Factor as listed above. If the surge actuator is reversed on your platform, utilize the Normal / Reversed button to reverse the surge motion compensation. 
IMPORTANT: When finished making changes, click SAVE at the top right in Sim Racing Studio.

Keyboard Shortcuts
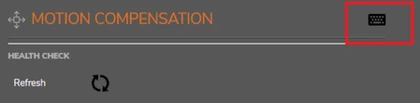
You can program Sim Racing Studio shortcuts for most of the SRS Motion Compensation commands. Click on the Keyboard icon on top right of the Motion Compensation page in Sim Racing Studio. It is suggested to set a Keyboard button for the ‘Motion Compensation Switch’. This will make it easy to stop Motion Compensation in Sim Racing Studio so you can compare the difference with and without it working.
Tuning Motion Compensation
To verify motion compensation is working correctly, load into a game with steep banks so you can place the vehicle on an extreme slope. Utilize any racing sim with the Daytona racetrack or any race track that has extremely high banked corners. You can also use a sim that has steep terrain, banked hills, or other means where you can consistently park the vehicle on the slope perpendicular and parallel to the track.
This will place the motion platform into an extreme roll or pitching position thus rotating the VR image. When motion compensation is working, the VR image will remain firmly locked behind the steering wheel. It will be as if you were looking out of the vehicle straight forward normally while sitting in the seat instead of the image being tilted to the side. Remember, the platform will be tilted, so ensure you are not compensating with your own body to stay upright.
To begin tuning motion compensation:
1) Turn OFF all the motion compensated axes of Roll, Sway, and Surge. Leave Pitch On.
2) Park the vehicle on the middle of the slope/bank so its resting pointed down track as you would normally race parallel with the track. This will role the motion platform to the side.
3) If the VR image Rolled instead of Pitched, click on the ‘Swap Roll/Pitch’ button. This is likely to occur if the Witmotion Sensor was installed with the USB cord/wires exiting to the left or right instead of the standard recommended direction of the USB cord/wires facing forwards. 
If the VR image did not Roll, Pitch and Roll do not need to be swapped.
4) Turn OFF Pitch
5) Turn On Roll and Sway
6) Did the VR image compensate for the slope/bank so it appears you are sitting level in the vehicle instead of being at an angle with the steering wheel directly in front of you?
a) If no, reverse Roll by selecting the Normal/Reversed toggle switch.
7) If the Roll angle looks correct, but you are not directly behind the steering wheel, adjust the Sway Factor slider in the SENSOR section up or down. This will adjust the image until you are behind the steering wheel. Once done, continue to the next step.
8) If you are still unable to align the image behind the steering while, try to increase or decrease the Seated Height (mm) field (1 minimum to 1200 max) until you feel it’s placed where you expect to see it (1000 is a default start setting).
9) Turn On Pitch again
10) Take note at the distance the VR image is from the steering wheel and use the virtual arms as a reference point for distance.
11) Drive off the slope/bank and re-approach it so you are perpendicular to the track and park on the slope/bank so the vehicle is now pitching up. This will pitch the motion platform backward.
12) Did the VR image compensate for the slope/bank so it appears you are sitting level in the vehicle instead of being pushed back into the seat or forward into the dashboard?
a) If no, reverse Pitch by selecting the Normal/Reversed toggle switch.
13) If the Pitch angle looks correct, but the distance from the steering wheel is too close or too far in comparison prior to driving on the slope/bank and pitching upward, adjust the Surge Factor slider in the SENSOR section up or down. This will adjust the image forward and backwards until you are behind the steering wheel at the correct distance. Once done, continue to the next step.
14) Turn on Surge.
IMPORTANT: If you have a dedicated surge actuator, skip to step #16. For non-actuator platforms, continue to step #15.
15) While still on the slope/bank with the vehicle pitching upwards, is the steering wheel still centered as before?
a) If not, try the Normal/Reversed toggle switch for Surge and/or increase or decrease the Seated Height (mm) field and/or adjust the Surge Factor slider in the SENSOR section up or down until you feel it’s placed where you expect to see it. You are finished calibrating motion compensation.
16) (Dedicated Actuator Surge Only) Leave the slope/bank and start driving normally on the track. Now brake and accelerate hard.
17) (Dedicated Actuator Surge Only) When braking hard, does the VR image move forwards or backwards instead of staying in place in the seat?
a) If not, try the Normal/Reversed toggle switch next to the Surge Horizontal Factor slider.
18) (Dedicated Actuator Surge Only) If the surge direction looks correct, but the distance from the steering wheel is too close or too far in comparison prior to accelerating or braking hard, adjust the Surge Horizontal Factor slider in the SENSOR section up or down. This will adjust the image forward and backwards until you are behind the steering wheel at the correct distance when accelerating or braking.
IMPORTANT: When finished, click SAVE at the top right in Sim Racing Studio if any changes were made.

Congratulations!
You are done and now have SRS Motion Compensation completely set up.
REMEMBER to follow the Pre-Launch Checklist to enable SRS Motion Compensation every time you play.
If you have any issues using Sim Racing Studio Motion Compensation, please use the troubleshooting here.
Pre-Launch Checklist
Anytime you restart SteamVR or OVRMC and are about to use SRS Motion Compensation, you must do the following:
Re-calibrate the Witmotion Sensor while the motion platform is level if you have relocated the platform or if its been a long time since you have used the Witmotion sensor by clicking on the Bullseye icons for Pitch and Roll in SRS > Motion Compensation > Sensors.
Check the “Set Velocity and Acceleration to zero” box in In OVRMC > Settings.
Check the "Enable Motion Compensation" box in OVRMC
Finally, click the "Apply" button in OVRMC.
This process must be done every time you want to use SRS Motion Compensation.
Example Settings
These are the SRS settings used for a PT Actuator 6DOF Simracing Platform (150mm: 7 Actuators (2 Front + 2 Rear + 2 TL + Surge) with the Front to Rear Vertical Actuator spacing at 1150mm and the Left to Right Vertical Actuator spacing at 745mm. The Witmotion Sensor is located under the seat mounted horizontally with the USB cord pointed towards the front of the platform. The VR HMD is a Valve Index. The Horizontal Surge Factor is Reversed since the surge actuator is reversed so accelerating moves the platform forward and braking moves the platform backward. Surge Factor has been reduced to 0 to remove excessive pitching compensation likely due to utilizing a horizontal surge actuator instead of pitch for surge.
Witmotion Sensor mounted under the seat: