To obtain the latest functionality of your Thanos controller, ensure you have the latest firmware version for your specific controller: the older 1280 chipset (128k) or the newer 2560 chipset (256k).
Note: For any hardware or firmware related issues with the Thanos Controller, please contact https://www.thanos-motion.com/support/
Step-By-Step Guide on Updating the Thanos AMC-AASD15A Controller Firmware
Source information utilized for this guide can be found here and via the videos at the bottom of this guide. A video description of the previous 2.25 firmware update process can be found here.
WARNING! - Before proceeding with a firmware update, copy your existing settings on your Thanos controller. Cycle through the menus and ensure you record or take a picture of each setting as you will need to re-enter them when you are finishing updating to a new firmware.
1. Identify the version (128k or 256k) of your Thanos Controller:
a. On the Thanos controller, set the #1 DIP switch to OFF.
b. Press the 'Reset' button on the Thanos controller
c. Watch the LCD screen for the following message that will indicate what chipset is utilized:
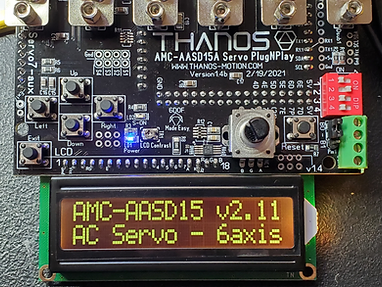
128K boards with firmware v2.11 fix 5 or older will display the following message below. (Note: 128K boards with a firmware version of v2.11 fix 5 or older will not display 1280 or 2560 on the LCD screen. This is an indication it is a 128K board)
128K boards with firmware v2.11 fix 6 or newer will display the following message:

256K boards will show the following message (Note the additional "2560" text):
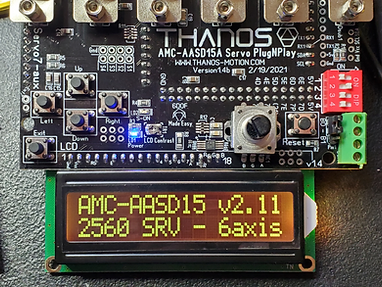
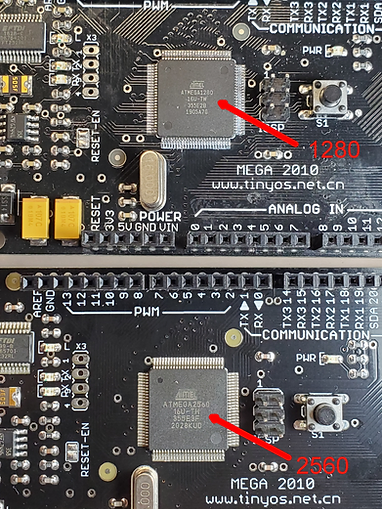
If you want to physically verify which chipset you have, you must remove the cover of your Thanos controller and inspect the chipset labeling indicated below:
2. Download the latest Thanos AMC-AASD15A controller firmware for your specific Thanos controller version (128k or 256k):
For the 128k version, download it here. Latest 128k version is: enc_1280_6dof_AMC_AASD15A_v2_26_beta_fix5_RGB.zip
For the 256k version, download it here. Latest 256k version is: enc_2560_6dof_AMC_AASD15A_v2_26_beta_fix5_RGB
(Note: Files may be updated in the future and have a different names)
WARNING: Do not use the Thanos4U firmware if you have a Thanos AMC-AASD15A controller. Only utilize the Thanos4U firmware with Thanos4U controllers recognizable by the "enc_Thanos4U_..." in the name of the firmware file.
3. Unzip the firmware to a location where you can find it. The firmware file is a *.hex file.
4. Download the AVRUBD Firmware Bootloader Utility from the same folder you downloaded the firmware update. (Note: The AVRUBD Firmware Bootloader Utility has been configured for your specific Thanos controller. Ensure you select the correct bootloader below.)
For the 128k version, download the 'AVRUBD_ 1280_Firmware_bootloader_Utility_52.zip' here.
For the 256k version, download the 'AVRUBD_ 2560_Firmware_bootloader_Utility_52.zip' here.
5. Unzip the AVRUBD Firmware Bootloader Utility 52.zip onto your computer
6. Close all other software that is platform or sim related including Sim Racing Studio (These programs scan COM ports and can block the AVRUBD utility).
7. Navigate to where you unzipped the AVRUBD Firmware Bootloader Utility and double click the 'avrubd.exe' file to start the firmware bootloader utility. Note the utility when running is called AVRUBD.
8. At the top of the AVRUBD utility, select 'Option'

9. Then select 'AVR'

10. A new window will open and you must verify the following settings based on the type of chipset (128k or 256k) you have.
IMPORTANT: Ensure you are utilizing the correct settings below for your controller chipset!
128k Thanos Controller:
In the AVR tab, verify the Flash size is 128K. In the Comport tab, verify the Baudrate is 19200 and change the Comport to the Comport the Thanos Controller is utilizing (See step #10 below on how to identify).
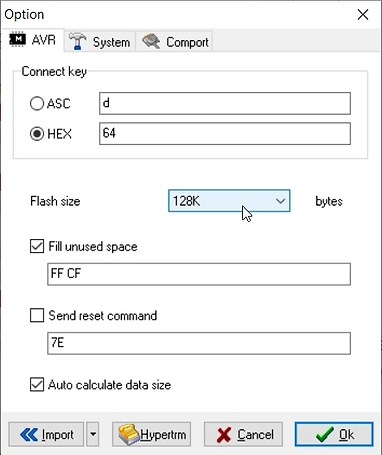
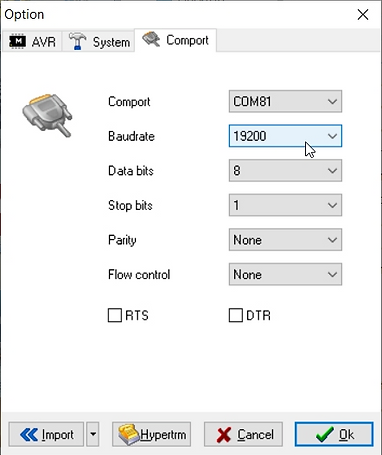
256k Thanos Controller:
In the AVR tab, verify the Flash size is 256K. In the Comport tab, verify the Baudrate is 56000 and change the Compot to the Comport the Thanos Controller is utilizing (See step #10 below on how to identify).

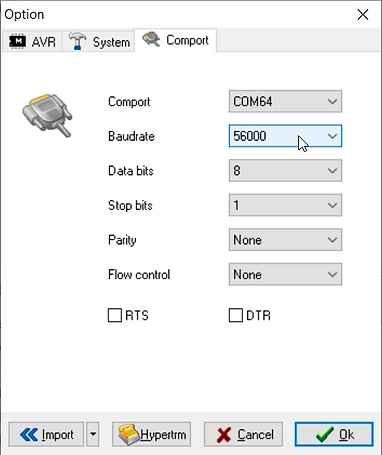
11. To determine what Comport your Thanos Controller is utilizing, navigate to the Device Manager on your computer, expand the section titled 'Ports (COM & LPT)', the Thanos Controller will be listed as one of the 'USB Serial Port (COM #)' listed. If there are multiple USB Serial Devices listed, unplug the Thanos Controller and note which one disappears. The COM # should be utilized in the Comport field in the Comport tab. Be sure to reconnect your Thanos Controller USB connection if you utilize this method before proceeding.
12. Once the AVR and Comport tabs are verified, click the OK button in the lower right to close the Option window.
13. Click on the Folder icon in the upper left (circled in red below) and navigate to where you unzipped the firmware hex file.
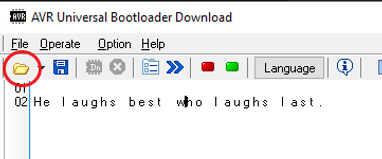
14. Select the firmware hex file and click Open. This will load the firmware to be ready to be downloaded and appears similar to the image below in the AVRUBD utility.

15. Verify the Thanos controller #1 DIP switch is ON. All the others can be in their default positions.
16. Next, remove the pin jumper (circled in red below) on the Thanos controller next to the DIP switches.
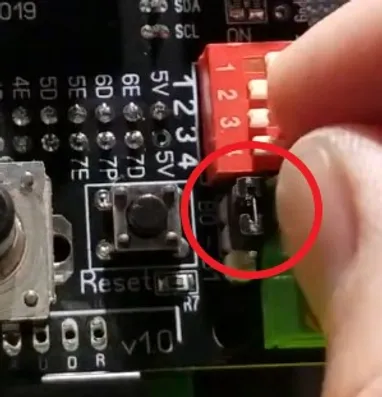
17. With the pin jumper removed, click the 'Reset' button once on the Thanos controller.
IMPORTANT: Please review step #20 below as you will need to attach the pin jumper while the new firmware is downloading to the Thanos controller!
18. Now, at the top of the AVRUBD utility, select Operate and then select Download. You can also click the Download icon at the top of the AVRUBD utility (circled in red below).

19. The firmware will then begin to download to the Thanos Controller and appear as below. Note the download progress bar in the lower right.
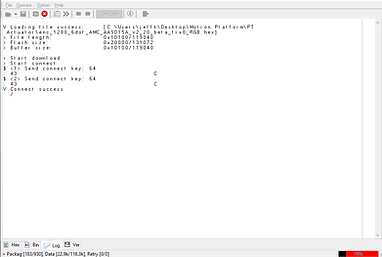
20. IMPORTANT: While the software is downloading, you must reinstall the pin jumper back onto the Thanos controller. It must be connected to the 1st and 2nd pin closest to the jumper switches.
Do not hit the 'Reset' button when placing the pin jumper back into place.
Note: If you fail to place the pin jumper back onto the Thanos panel before the download is complete. Simply hit the Reset button on the Thanos controller, close and reopen the AVRUBD utility, ensure the Option settings are still set correctly for your chipset, select the firmware hex file again, and then select Download. Be sure to place the pin jump back on the Thanos controller while its still downloading.
21. One the firmware is done downloading, there will be audible clicking/beep noise from your computer and the AVRUBD utility will look similar to the image below.
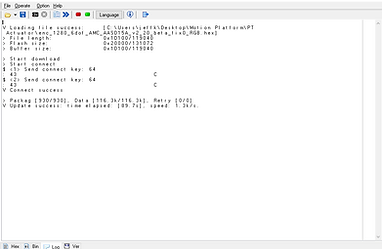
22. On the Thanos controller, click the 'Reset' button one more time.
23. You can navigate through the Thanos menu on the controller to verify all the menu settings are present. You can also hit the 'Reset' button and the LCD menu will cycle and you will see the firmware version displayed. Finally, you can confirm by scrolling the Thanos Controller menu to the end and you will see the current firmware version.
24. Verify the Thanos DIP switches are in their normal operating position:
1 - ON
2 - ON (Set to ON to enable the LEDs if you have an Emergency Stop Button; otherwise OFF)
3 - OFF
4 - OFF
25. IMPORTANT: After loading the new firmware, hold down the 'EXIT' button on the Thanos controller. While continuing to hold down the 'EXIT' button, press and release the "RESET" button to restore the default parameters. Now release the 'EXIT' button. This is needed to remove any incorrectly stored values from the epprom from the previous firmware as sometimes these get updated too. (Click here for video).
26. Set the Thanos settings specific to your platform from what you recorded at the beginning of this guide. You are now finished with the firmware update!
Firmware update procedure for the AMC-AASD15A (older 1280 chipset)
Firmware update procedure for the AMC-AASD15A (newer 2560 chipset)
