Please use the guidance below to setup your Thanos4U controller to work with Sim Racing Studio. The guide will cover the following topics:
- Sim Racing Studio Setup
- Thanos4U Actuator Connections and DIP Switch Settings
- One Emergency Stop Button with Two Thanos4U Controllers
- Thanos4U Manual and Firmware Files
- Feature Comparison between Thanos4U and AMC-AASD15A
- Videos:
- Thanos4U Introduction
- Manually Updating the Thanos4U Firmware
- SRS Motion Testing for 7 Actuators Using Two Thanos4Us
- Factory Programming the Thanos4U Controller
- 3D Printer Files for Thanos4U Case
- One Emergency Stop Button with Two Thanos4U Controllers
- Helpful Links
Sim Racing Studio Setup
Below are the basic instructions on setting up your Thanos4U in Sim Racing Studio. Please see the 'Thanos4U Actuator Conntections and DIP Switch Settings' section below if you are using two Thanos4U controllers:
In Sim Racing Studio, go to SETUP > Hardware.
In the section for Manufacturer, select THANOS and select the appropriate number of actuators for you motion platform.
You must click SAVE in the upper right of Sim Racing Studio for the settings to remain.
Close Sim Racing Studio
Re-Open Sim Racing Studio and it will detect and setup the Thanos4U controller(s).
Press the gear icon next to model to see the axis assignments for the actuators
Thanos4U Actuator Connections and DIP Switch Settings
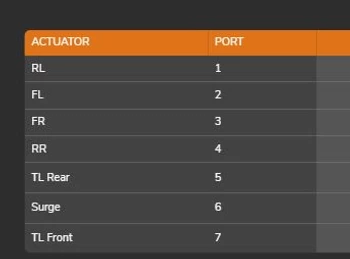
The actuator order is same as in the AMC-AASD15A (see image below), but on Thanos4U connect as:
Main Thanos4U:
Act1 (RL) = port1
Act2 (FL) = port2
Act3 (FR) = port3
Act4 (RR) = port4
Secondary Thanos4U:
Act5 (TL Rear) = port1
Act6 (Surge) = port2
Act7 (TL Front) = port3
IMPORTANT: The secondary Thanos4U needs the DIP switch #1 to ON position for SRS to know which is main and which is secondary. Utilize the image below from the Thanos4U manual for DIP switch positioning:

Feature Comparison between Thanos4U and AMC-AASD15A

Per Thanos "Main differences are the plug and play supported software, ways to access the parameters, and number of actuators supported by each. But there are hidden differences in the internal engine of the Thanos4U, with highly optimized code for fixed timing of the pulses interleaved across all 4 motors, that results in much smoother and fluid operation (reference link).
Thanos4U Introduction
Manually Updating the Thanos4U Firmware
The Thanos4U user manual and most recent firmware files can be found here.
SRS Motion Testing for 7 Actuators Using Two Thanos4Us
Factory Programming the Thanos4U Controller
3D Printer Files for Thanos4U Case
The Thanos4U Motion Controller does not come with a case. Thanos has provided the necessary 3D printer files for the cases to be printed. These files can be downloaded from Thingiverse here.
Note: Each case will require four 4-40 x 1/2 inch screws to complete. Flathead screws are recommended to be flush with the printed face-plate.
One Emergency Stop Button with Two Thanos4U Controllers
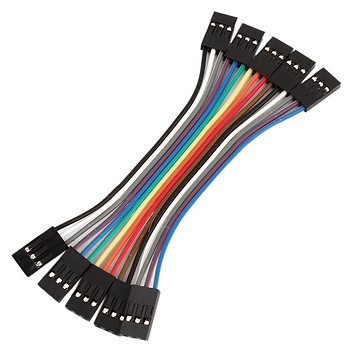
If you have more than 4 actuators, you will need two Thanos4U Motion Controllers. In order for a single Emergency Stop Button (eStop) to work with two Thanos4U Controllers, you must connect them via a 3-Pin Female-to-Female Jumper Cable. These are not included with the purchase of the Thanos4U Motion Controller. It is highly recommended to:
Use as short a cable as possible to mitigate interference as the cable can act like an antenna.
Use a shielded cable, if possible, to avoid EMI interference
When using a single eStop, the 3-pin Jumper Cable can be connected to either the left or right side from the Primary Controller to the left or right side of the Secondary Controller. Any combination will work. Once the cable is connected, no other settings on the Thanos4U or SRS are required for the single eStop to work.
Note: Connect the eStop RJ45 cable to the Thanos4U Controller that you want the LEDs to be displayed.
Example non-shielded cable (Note: 5 cables are shown):
Helpful Links
Thanos4U Motion Controller - The primary product page to purchase the Thanos4U Motion Controller.
Thanos4U servo motion controller - Contains information on features of the Thanos4U controller
Actuator Setup Links - Contains many links regarding the setup and troubleshooting for other Thanos controllers and various actuator platforms.